I would like to create a pane containing scrollable log output and be able to add to the log output over time.
Does anyone have any suggestions as to the best way to do this or point to any examples?
I would like to create a pane containing scrollable log output and be able to add to the log output over time.
Does anyone have any suggestions as to the best way to do this or point to any examples?
Great question. I have been looking to try out something like that as well.
I think the answer is to use a Stream pane. You can find the reference guide here.
https://panel.holoviz.org/reference/panes/Streamz.html#panes-gallery-streamz
Please post if that leads to new questions or if it solves it share a small example if you can.
Good luck.
Yes that seems like a good approach, perhaps we need some way to keep some history though.
A markdown kind of works:
import param
import panel as pn
import logging
import time
pn.extension()

class LoggingMarkdown(pn.pane.Markdown):
    def write(self, line):
        self.object += line

md = LoggingMarkdown('### Logging Window  \n', height=400, width=500)

logger = logging.getLogger('project')
logger.setLevel(logging.DEBUG)

sh = logging.StreamHandler(md)
sh.terminator = '  \n'
formatter = logging.Formatter('%(asctime)s [%(levelname)s]: %(message)s')

sh.setFormatter(formatter)
sh.setLevel(logging.DEBUG)
logger.addHandler(sh)

md
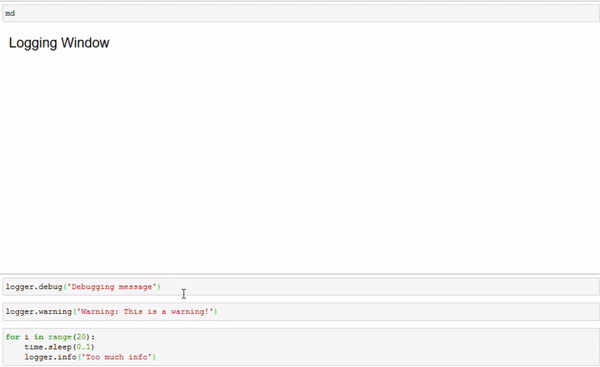
Is there a way to make it automatically scroll down?
Scroll I don’t know about. But you could implement Write in a way so that it only shows the last x lines or the list in reverse order.
Don’t know if that will work for you?
Hi, i tried to adapt @Jhsmit 's code and manage to find a workaround for the autoscroll.
Here is the code :
    import param
    import panel as pn
    import logging
    import time

    css = '''
    .bk.cont {
        border:dashed 1px black;
        overflow-y:scroll;
        overflow-x:hidden;
    }
    '''

    pn.extension(raw_css=[css])


    class LoggingMarkdown(pn.pane.Markdown):
        cpt = pn.widgets.IntInput()
        bot = param.Action(lambda x : x.param.trigger())
        cpt.width=0
        cpt.height=0
        cpt.jscallback(value="""
    let elem = document.getElementsByClassName('cont');
    elem[0].scrollTop = elem[0].scrollHeight;
    """)


        def write(self, line):
            self.object += line

        @param.depends('object',watch=True)
        def to_bottom(self):
            self.cpt.value+=1


    md = LoggingMarkdown('### Logging Window  \n',
                         css_classes=['prompt_'],sizing_mode='stretch_width'
                        )

    logger = logging.getLogger('project')
    logger.setLevel(logging.DEBUG)

    sh = logging.StreamHandler(md)
    sh.terminator = '  \n'
    formatter = logging.Formatter('%(asctime)s [%(levelname)s]: %(message)s')

    sh.setFormatter(formatter)
    sh.setLevel(logging.DEBUG)
    logger.addHandler(sh)

    pn.Column(
        pn.Row(md,width=400,height=400,sizing_mode='stretch_width',css_classes=['cont']),md.cpt,sizing_mode='stretch_width')
and the loop :
    for i in range(10):
        logger.debug('too much info')
        md.cpt.value+=1
In jupyter it works great, but with panel show, sometime I can’t feed it with a loop. The server waits until the end of the loop before refreshing the markdown.
Without md.cpt.value+=1 after each message, the markdown scroll until the penultimate line because the callback trigger before the new line is added.
I know this solution is a bit ugly, does someone know a way of triggering a js callback without creating an intermediate param ? or a way to specify the order of all callbacks.
Hi,
I got very inspired by this post and it led me to learn some web tech, HTML, CSS, JS and the DOM.
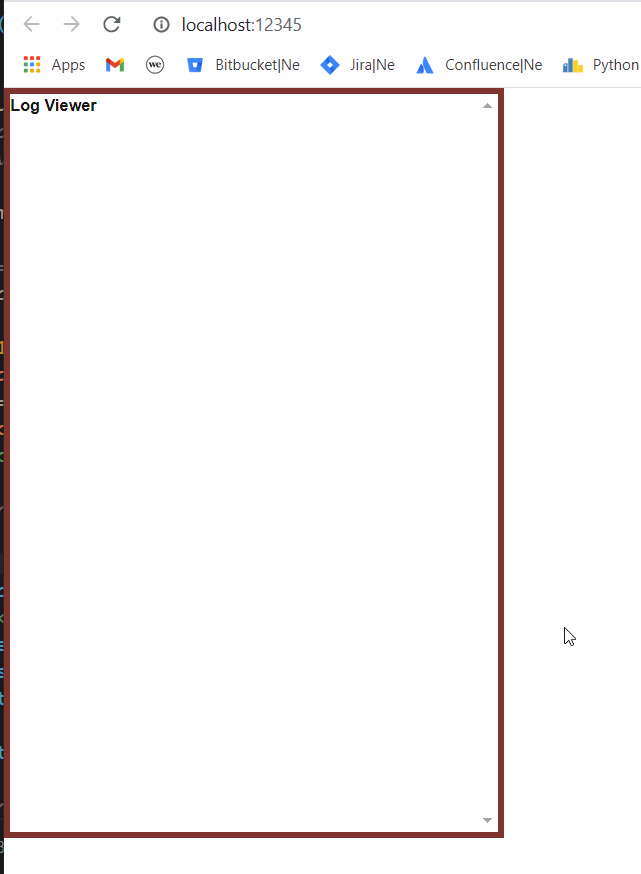
I made LogViewer class that returns a Panel object and has a write method.
There is an auto-scroll “smart and sticky” : if the user scrolls up, then the auto-scroll stops, if the users scrolls back the most down then the auto-scroll kicks back in.
There is also an max_history parameter that let you keep only the last x logs to prevent overflow.
You can find my code in the feature request I opened
@GilShoshan94 this is awesome. I really wanted a log viewer, or rather, a console. I am old DOS kind of guy.
I have been playing with some js terminal options, first TerminalJS (not worth it) and then ptty, which are both easy to implement. I was not worried about getting the commands to trigger a python function, but at least to output something so I can know where things are.
I’ve taken your post as a reference, as I am not a specialist in panel. Although I made a different approach.
I started by implementing a TerminalPlot.py (mimicking PlotlyPlot.py) to be able to load the JS from the pn.extension(‘terminal’) command. This works very well as ptty has only two JS files to load.
Then, instead of using the two pane.HTML as you did, I subclassed DivPanelBase. I wanted this new class to be the only class, but the only parameter that I could store a string and trigger a jslink/jscallback is .object. I tried creating new parameters, but Bokeh seems to have a predefined list which I did not manage to go around. So I subclasses CompositeWidget and add the new class and a pane.HTML one, like you did.
I used a jslink instead of writing the script into the object directly. Ihad many skiped number and even time.sleep was not helping
Now it seems to work, (repeated object value or not), but I don’t know enough panel or JS (at all) to make it better coded.
I can share the filees if you want, although they are a bit of a mess.
I might be able to help. Please share the code either here or as a PR.
There is a Feature request here for the xterm.js terminal. https://github.com/holoviz/panel/issues/1925
Sure @Marc,
_imports = { 'katex': 'panel.models.katex', 'mathjax': 'panel.models.mathjax', 'plotly': 'panel.models.plotly', 'deckgl': 'panel.models.deckgl', 'vega': 'panel.models.vega', 'vtk': 'panel.models.vtk', 'ace': 'panel.models.ace', 'echarts': 'panel.models.echarts', 'ipywidgets': 'ipywidgets_bokeh.widget', 'terminal': 'panel.models.terminal' }
Sorry for the messy code, have fun!!!
terminal.py (870 Bytes)
app.py (2.5 KB)
Hi @miliante,
I’m neither a specialist in panel (yet  ) , nor know JS (I gave it one full day with this tutorial, the relevant part is JS HTML DOM)
I have a good background in Python so I prefer to stay with Panel and to do less JS and browser stuff (that’s why Panel exist also, isn’t it ?). I know Panel is built on top of Bokeh that itself is built on top of Tornado. I know there is also a JS code called BokehJS. It’s all linked and is a wonderful machinery, and quiet complex for inexperience people such as myself. I read a lot of source code on GitHub to understand the behind the scenes. Panel, Bokeh and @Marc’s code as well.
Anyway, what I mean is that I won’t be able to write a proper new component to Panel that can be pull requested in, but I wanted to contribute as I could at my level and give the relevant JS code to do the auto scroll and smart sticky scroll.
I rewrote my LogViewer to make it work as a Panel object so you can integrate it in a Panel Layout normally by sub classing a Panel Column.
Here is my updated code if it can help you :
Python:
import time
from html import escape

import panel as pn
from bokeh.util.serialization import make_globally_unique_id


class _LogViewer:
    # class id counter to be unique
    id_counter = 0

    @classmethod
    def _get_new_ID(cls) -> str:
        cls.id_counter += 1
        return f"logviewer_{cls.id_counter}_{make_globally_unique_id()}"

    def __init__(self, log_title="Log Viewer", max_history=1000, *args, **kwargs):

        self.ID = self._get_new_ID()

        # history max to save only the last 'MAX_HISTORY' messages
        self.MAX_HISTORY = max_history
        self.LOG_TITLE = log_title

        self._class = "logviewer"
        self._classtmp = "logviewer-tmp"
        self.html_pane = pn.pane.HTML(*args, **kwargs)
        self.html_pane.object = f"""<div id={self.ID} class="{self._class}"><div><b>{self.LOG_TITLE}</b></div></div>"""
        self.html_tmp = pn.pane.HTML(
            css_classes=["logviewer-tmp"],
            style={"visibility": "hidden", "overflow": "hidden"},
            margin=0,
            width=0,
            height=0,
        )

        self._view = pn.Column(self.html_pane, self.html_tmp)

    @property
    def view(self):
        return self._view

    def txt_pre_process(
        self, line: str, html: bool, css_classes: list = None, inline_style: dict = None, bold=False
    ) -> str:
        """
        Preprocess the content

        Parameters
        ----------
        line : str
            The new log/html to feed the logviewer
        html : bool
            If True, the line is not escaped and will be pass as raw html.
        css_classes : list, optional
            List of CSS classes to ad to the `class` attribute of <span> element
        inline_style : dict, optional
            Inline CSS to add to the `style` attribute of the <span> element
        bold : bool, optional
            For convinence, add <b> tag around the whole line, by default False

        Returns
        -------
        str
            The processed content to put inside the new <div> element
        """

        if html:
            newline = line
        else:
            newline = escape(line)

        classes = ""
        if css_classes:
            for c in css_classes:
                classes += f"{c} "
            if classes != "":
                classes = f' class="{classes}"'
            # newline = f"""<span class="{classes}">""" + newline + """</span>"""

        style = ""
        if inline_style:
            for proper, val in inline_style.items():
                style += f"{proper}:{val};"
            if style != "":
                style = f' style="{style}"'
            # newline = f"""<span style="{style}">""" + newline + """</span>"""

        newline = f"""<span{classes}{style}>""" + newline + """</span>"""

        if bold:
            newline = """<b>""" + newline + """</b>"""

        return newline

    def _write_with_direct_js_call(
        self, line: str, html: bool, css_classes: list = None, inline_style: dict = None, bold=False
    ):
        newline = self.txt_pre_process(
            line=line, html=html, css_classes=css_classes, inline_style=inline_style, bold=bold
        )
        newline = newline.replace("\\", "\\\\")  # required since injected directly in JS
        newline = newline.replace("`", "\\`")  # required, injected directly in JS, we use tick `` for the newlog arg.

        update_code = f"FeedSmartAutoScrollByID(`{self.ID}`, `{newline}`, {self.MAX_HISTORY});"  # `` are for str in JS
        self.html_tmp.object = f"<script>{update_code}</script>"
        time.sleep(0.000001)  # Important to pause to let Panel works (Python is slow...)
        self.html_tmp.object = ""  # Important to reset as Panel change the HTML DOM only if html_tmp.object changes !
        # So html_tmp.object.new != html_tmp.object.old, otherwise the JS is not called....

    def write(self, line: str, html: bool, css_classes: list = None, inline_style: dict = None, bold=False):
        """
        Add a new log/html to the logviewer

        Parameters
        ----------
        line : str
            The new log/html to feed the logviewer
        html : bool
            If True, the line is not escaped and will be pass as raw html.
        css_classes : list, optional
            List of CSS classes to ad to the `class` attribute of <span> element
        inline_style : dict, optional
            Inline CSS to add to the `style` attribute of the <span> element
        bold : bool, optional
            For convinence, add <b> tag around the whole line, by default False
        """

        self._write_with_direct_js_call(
            line=line, html=html, css_classes=css_classes, inline_style=inline_style, bold=bold
        )


class LogViewer(pn.Column):
    def __init__(self, log_title="Log Viewer", max_history=1000, *args, **kwargs):
        self._lv = _LogViewer(log_title, max_history, *args, **kwargs)
        super().__init__(self._lv.html_pane, self._lv.html_tmp)

    def write(self, line: str, html: bool, css_classes: list = None, inline_style: dict = None, bold=False):
        """
        Add a new log/html to the logviewer

        Parameters
        ----------
        line : str
            The new log/html to feed the logviewer
        html : bool
            If True, the line is not escaped and will be pass as raw html.
        css_classes : list, optional
            List of CSS classes to ad to the `class` attribute of <span> element
        inline_style : dict, optional
            Inline CSS to add to the `style` attribute of the <span> element
        bold : bool, optional
            For convinence, add <b> tag around the whole line, by default False
        """
        self._lv.write(line=line, html=html, css_classes=css_classes, inline_style=inline_style, bold=bold)
CSS classes I used:
.logviewer {
    height: inherit;
    width: inherit;
    overflow-y:scroll;
    overflow-x:hidden;
}

.logviewer-tmp {
    display: block !important;
    visibility: hidden !important;
    width: 0 !important;
    height: 0 !important;
    overflow: hidden !important;
}
JS:
"use strict";

function SetScrollDown(elem) {
    elem.scrollTop = elem.scrollHeight - elem.clientHeight
}

function FeedSmartAutoScroll(elem, newlog) {
    // allow 10px inaccuracy by requirering <= 10
    let isScrolledToBottom = (elem.scrollHeight - elem.clientHeight - elem.scrollTop <= 10);
    if (newlog) {
        let newElement = document.createElement("div");
        newElement.innerHTML = newlog;
        elem.appendChild(newElement);
    }
    if (isScrolledToBottom) {
        SetScrollDown(elem)
    }
}


function FeedSmartAutoScrollByID(elemid, newlog, max_elem) {

    // caching block to avoid accessing the DOM (document.getElementById)
    {
        FeedSmartAutoScrollByID.cache = FeedSmartAutoScrollByID.cache || {};
        // console.log(FeedSmartAutoScrollByID.cache);
        let cache = FeedSmartAutoScrollByID.cache; // by reference since object, just for shorter name
        if (!cache.hasOwnProperty(elemid)) {
            console.log("caching... " + elemid)
            let logviewer_search = document.getElementById(elemid);
            if (logviewer_search !== null) { cache[elemid] = logviewer_search; }
            else {
                console.error("Error : Cannot find logviewer with ID < " + elemid + " >");
            }
        }
        // else {
        //     console.log("hit cache")
        // }
    }

    let logviewer = FeedSmartAutoScrollByID.cache[elemid]  // retreive from cache

    // console.log(logviewer);

    if (logviewer) {
        if (!((typeof newlog == 'string') || (newlog instanceof String))) {
            newlog = "Problem in feed_new_line_code..."
            console.log("Problem in feed_new_line_code...")
            console.log(typeof newlog)
            console.log(newlog instanceof String)
        }
        FeedSmartAutoScroll(logviewer, newlog)

        if (logviewer.childElementCount >= max_elem) {
            logviewer.removeChild(logviewer.firstElementChild);
        }
    }
}
In _LogViewer:
I am using the make_globally_unique_id function from bokeh to be in line with Panel (even if it’s only a uuid : str(uuid.uuid4()) ) and be futureproof for no conflict.
The id_counter and _get_new_ID are redundant since I use make_globally_unique_id and can be removed (it was just easier for me when I was debugging)
For html_tmp I use a CSS class and still set the style, margin and dimension, it is because Panel has some default and doesn’t let you override them with CSS when it renders, you can add styling with CSS but the core proprieties like visibility are overridden by Panel… So ideally I would use my CSS class but can’t … So you can safely remove my CSS class logviewer-tmp as it is useless now.
For the main CSS class, logviewer, I left the core properties you need to make it function. You can add more styling if you want like a border (maybe you need a CSS tutorial)
So the result, you have a LogViewer which inherit from pn.Column, so it’s a Panel object.
It has one method: write().
I put comments in the code.
For the CSS code, you can add it raw pn.extension(raw_css=[css]) or you can add it as an external file like I prefer to do (see Panel docmentation)
For the JS code, you can write in in place in the _write_with_direct_js_call method in _LogViewer (ugly I think) or add the JS file as an external resource (like I do)
I use panel in Jupyter only to toy with it and test quickly the basic but I actually don’t use it in Jupyter so I didn’t test how well it work inside Jupyter. I works really well in standalone.
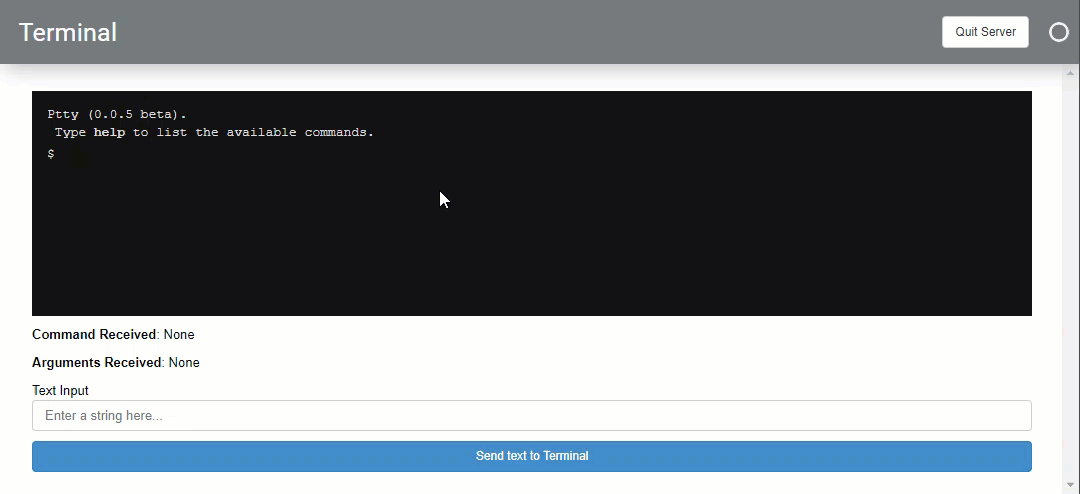
Hello @GilShoshan94,
I simplified mine a little bit more. I only have a class: Terminal(DivPaneBase), which is a pane. But it takes as input the theme (pn.template.MaterialTemplate, in my case). That way it uses the update to the template._js_area.object to write to the console.
Have fun. I sure am.
app.py (2.0 KB)
Nice !
I didn’t succeed to run you code in standalone with panel serve app.py and didn’t try it in Jupyter.
So I tried to quickly fix the error but it still didn’t work (I got the template opened but the terminal stay black and empty, when I click on the button, I got the ‘here’ printed in the command line but not in your terminal …)
But I read your code and really like the clever randspace in your write method.
If I understood well from your code:
    def write(self, arg1):
        import random
        randspace = random.randint(1, 5)*' '
        self.template._js_area.object = f"""<script>$ptty.echo(JSON.parse(JSON.stringify('{str(arg1)}')), false)</script>{randspace}"""
The randspace is there to prevent missing the update in the case your are writing exactly the same arg1 several time in a row, isn’t it ?
It’s too fix the same problem I had and fixed with the time.sleep(0.000001) and reset self.html_tmp.object = "".
Right ?
If so I love it if it work and would say it can be improved by have a two state method where you compare if the past input is the same than the present one a only then add a space instead of a random amount.
And if I am wrong then let me know what I misunderstood please.
Sorry,for the late reply, back to the “real” world today.
Yes. it was to prevent not updating the variable
Another update…
After some vacation I decided to solve also this problem. So, some copy / paste from my other post, but updated to the terminal ![]()
I’ve implemented it in my convoluted way as I wanted it not to feel as a custom widget, but part of panel (and hopefully included through a PR). Be aware that the only thing I know (even if limited as I am not a programmer) is python, I learned to really dislike TypeScript and jQuery.
So…there is a model and a widget, both files named ptty.py. The TypeScript I included as an “__implementation__” because I don’t know how to pre-compile it.
Also, I have changed three other files:
‘ptty’: ‘panel.models.ptty’
export {PttyPlot} from “./ptty”
from .ptty import Ptty # noqa
note: this time I did not create a dist\bundled\PttyPlot folder with tthe js files because I am calling it from the developers site, but it is an option run it locally. Better option I think.
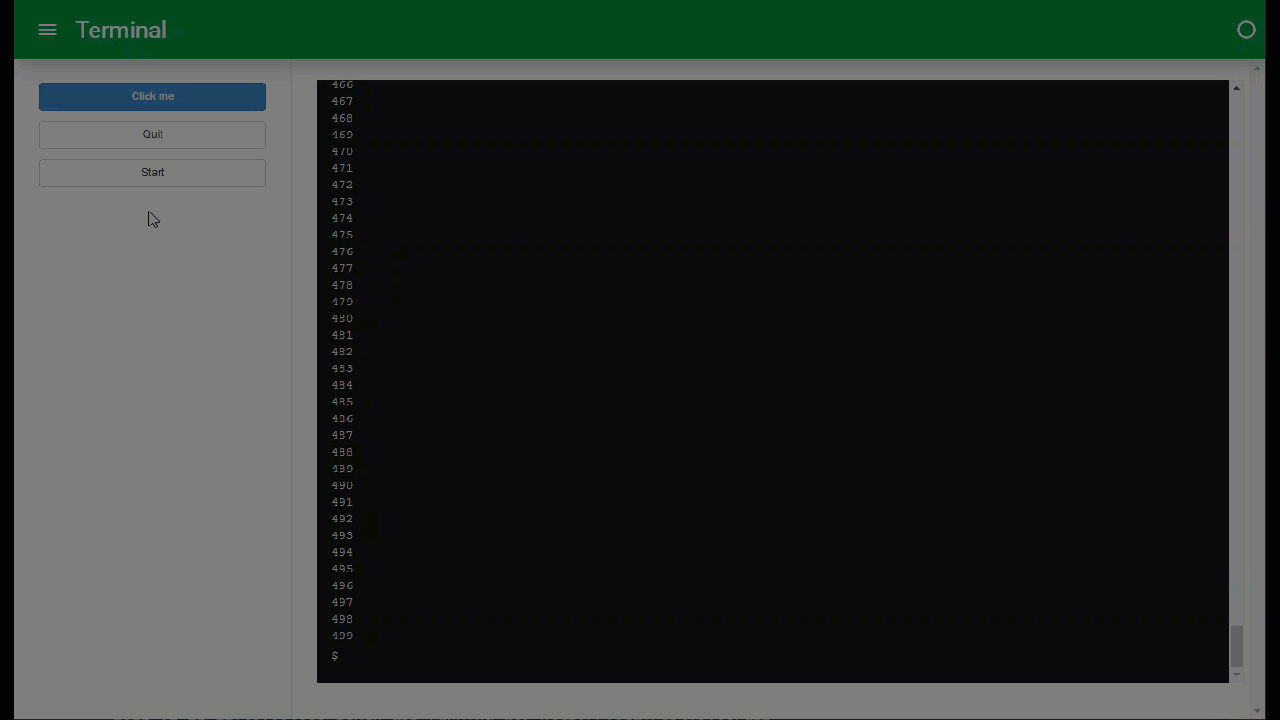
I also included a term.py file with an example. I managed to make the callbacks work, so wanto to send something to the terminal you can, but I still did not manage to fi the repeated string issue. Also you can get the information back from the terminal using callbak. Checj the example file and the gif I attached. term.py (1.7 KB)
In the example I created a command named: Panel and you can see it registered when i issue help. When you call the command (case sensitive) it trigers ‘command_issued’ argument and updates the StaticText with the command name (‘Panel’) and the arguments ([‘here’, ‘at’, ‘home’]), that way you know what was called to act accordingly. Afterward I write some text and send it to the terminal. Of course you can put it in the code by simply updating the ‘text’ parameter everytime.
I think I managed to grasp the callback routines and could implement more options, but htis is the minimum that I need: issue a command and let python know and send a message
Have fun!
I’m working on a Terminal PR for panel based on xermjs. I will go though your examples and learn.
First one is the initial one from @Jhsmit
panel_terminal2
The Terminal Widget is available since Panel 0.12.
I just wanted to share that Column now has auto_scroll_limit to keep appending items stick to the bottom.