Using geoviews tile sources offline?

Hi Holoviz discourse,

I would like to use the goeviews tile sources in an offline JupyterHub environment. Tiles access the underlying tile source with a URL. For the geoviews features like coastlines and states, I was able to download the cartopy features and configure cartopy to use the local files instead. Is there something similar for the geoviews tiles? Is it possible to use any tile sources offline?

Thank you!

1 Like

Tile sources are just images, so you can copy the images from their source to any local mirror you like and use a URL pointing to that web server rather than the default one. That said, there are a lot of images in most tile sources, depending on how many levels deep they are., so copying them can be time consuming, expensive, and possibly disallowed by the tile source provider (who may cut you off part way through downloading the big stack of images). If you don’t need much resolution you can download the first few levels easily. E.g. the top level might be one 256x256 image, then 4 of them for the next, and so on, quickly becoming a very large number. Or you can pre-fetch only a small local area’s tiles, similarly. See Tiled web map - Wikipedia for details.

1 Like

@veevee56 how did you “point” geoviews to the cartopy vector folder? Can you refer me to the function?

1 Like

Okay, here’s how I got it to work.

Preparing environment

  1. Create a new cartopy environment (or use your existing):
conda create -n cartopy_env python=3.10
  1. Install all the relevant packages:
conda install -c conda-forge geoviews cartopy cartopy_offlinedata
  1. Verify the offline shapefiles exist:
from pathlib import Path
import cartopy

data_dir = cartopy.config["pre_existing_data_dir"]
list((Path(data_dir) / "shapefiles" / "natural_earth" / "cultural").glob("*"))

You should see a long list:

[PosixPath('/Users/ahuang/miniconda3/envs/cartopy_env/share/cartopy/shapefiles/natural_earth/cultural/ne_110m_admin_0_countries.shx'), PosixPath('/Users/ahuang/miniconda3/envs/cartopy_env/share/cartopy/shapefiles/natural_earth/cultural/ne_50m_admin_0_sovereignty.shx'), PosixPath('/Users/ahuang/miniconda3/envs/cartopy_env/share/cartopy/shapefiles/natural_earth/cultural/ne_110m_admin_0_countries_lakes.shx'), PosixPath('/Users/ahuang/miniconda3/envs/cartopy_env/share/cartopy/shapefiles/natural_earth/cultural/ne_10m_urban_areas.shx'), PosixPath('/Users/ahuang/miniconda3/envs/cartopy_env/share/cartopy/shapefiles/natural_earth/cultural/ne_10m_roads.cpg'), PosixPath('/Users/ahuang/miniconda3/envs/cartopy_env/share/cartopy/shapefiles/natural_earth/cultural/ne_10m_roads.shp')...

Using geoviews offline

Test using geoviews and switch off internet connection; if the machine is sealed from the internet and you’re planning to view the output on that machine, be sure to set resources=INLINE, or else opening the HTML file will result in a blank page.

import geoviews as gv
from bokeh.resources import INLINE

gv.extension("bokeh")

coastline = gv.feature.coastline()
borders = gv.feature.borders()
world = (coastline * borders).opts(global_extent=True)

gv.save(world, "world.html", resources=INLINE)

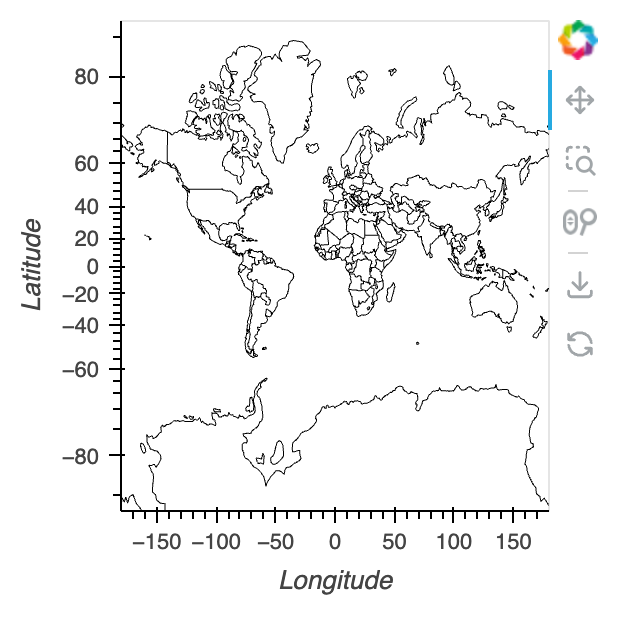
You should see this output:

Changing the default data directory

If you are unsatisfied with the default data directory that the data was downloaded to, it can be changed!

Here, I move it inside my user directory.

mkdir /Users/ahuang/.cartopy/
mv /Users/ahuang/miniconda3/envs/cartopy_env/share/cartopy /Users/ahuang/.cartopy/

If we try to re-run the geoviews code above, you should see something like this:

/Users/ahuang/miniconda3/envs/cartopy_env/lib/python3.10/site-packages/cartopy/io/__init__.py:241: DownloadWarning: Downloading: https://naturalearth.s3.amazonaws.com/110m_physical/ne_110m_coastline.zip
  warnings.warn(f'Downloading: {url}', DownloadWarning)
...
urllib.error.URLError: <urlopen error [Errno 8] nodename nor servname provided, or not known>

To fix, update cartopy.config:

import cartopy
import geoviews as gv
from bokeh.resources import INLINE

cartopy.config["pre_existing_data_dir"] = "/Users/ahuang/.cartopy/cartopy"
print(cartopy.config)

gv.extension("bokeh")

coastline = gv.feature.coastline()
borders = gv.feature.borders()
world = (coastline * borders).opts(global_extent=True)

gv.save(world, "world.html", resources=INLINE)
1 Like

Here’s how you can use tiles offline.

  1. First cache/convert the tiles.
from pathlib import Path
import numpy as np
from shapely import box
import cartopy.io.img_tiles as cimgt
import cartopy.crs as ccrs

from PIL import Image


def cache_tiles(
    tile_source,
    max_target_z=1,
    x_bounds=(-180, 180),
    y_bounds=(-90, 90),
    cache_dir="tiles",
):
    """
    Caches map tiles within specified bounds from a given tile source.

    Args:
        tile_source (str or cartopy.io.img_tiles.Tiles): The tile source to use for caching.
            It can be a string specifying a built-in tile source, or an instance of a custom tile source class.
        max_target_z (int, optional): The maximum zoom level to cache. Defaults to 1.
        x_bounds (tuple, optional): The longitudinal bounds of the tiles to cache. Defaults to (-180, 180).
        y_bounds (tuple, optional): The latitudinal bounds of the tiles to cache. Defaults to (-90, 90).
        cache_dir (str, optional): The directory to store the cached tiles. Defaults to "tiles".

    Returns:
        pathlib.Path: The path to the cache directory.
    """
    if not isinstance(tile_source, cimgt.GoogleWTS):
        tile_source = getattr(cimgt, tile_source)
    tiles = tile_source(cache=cache_dir)

    bbox = ccrs.GOOGLE_MERCATOR.transform_points(
        ccrs.PlateCarree(), x=np.array(x_bounds), y=np.array(y_bounds)
    )[
        :, :-1
    ].flatten()  # drop Z, then convert to x0, y0, x1, y1
    target_domain = box(*bbox)

    for target_z in range(max_target_z):
        tiles.image_for_domain(target_domain, target_z)
    return Path(cache_dir) / tile_source.__name__


def convert_tiles_cache(cache_dir):
    """
    Converts cached tiles from numpy format to PNG format.

    Args:
        cache_dir (str): The directory containing the cached tiles in numpy format.

    Returns:
        str: The format string representing the converted PNG tiles.
    """
    for np_path in Path(cache_dir).rglob("*.npy"):
        img = Image.fromarray(np.load(np_path))
        img_path = Path(str(np_path.with_suffix(".png")).replace("_", "/"))
        img_path.parent.mkdir(parents=True, exist_ok=True)
        img.save(img_path)

    tiles_fmt = str(cache_dir / "{X}" / "{Y}" / "{Z}.png")
    return tiles_fmt


tiles_dir = convert_tiles_cache(cache_tiles("OSM", max_target_z=6))

Here’s what the directory looks like:
image

  1. Then using it in GeoViews is effortless!
import geoviews as gv

gv.extension("bokeh")

gv.WMTS(tiles_dir).opts(global_extent=True)

At various zoom levels:

At deep zoom levels, it’ll result in white because there’s no data at that zoom level.

To prevent it from trying to access missing data, set max_zoom equal to your max_target_z

import geoviews as gv

gv.extension("bokeh")

gv.WMTS(tiles_dir).opts(global_extent=True, max_zoom=6)